顯示具有 Unity 標籤的文章。 顯示所有文章

2019年12月3日 星期二

Unity內使用JSON的方式

JSON已是經典的資料格式之一了,而以前我在物聯網公司工作時,其中一項工作就是處理那一大堆的JSON資料。

那實在是整死人,因為那時的資料架構很多是沒有固定的,也就是裡面的欄位會任意增減,所以我都用原始的方式去一一檢驗裡面的架構再取得資料。

現在就輕鬆多了,資料架構都是事先固定的,故可用JSONObject一次性搞定,這邊就來記錄一下。

這邊使用的是LitJson,其他的Json也有一樣的做法。

首先是準備資料,我準備了一個JSON字串如下:
[{"name":"這是一號清單","listID":1,"listData":[{"id":1,"content":"一號內容1"},{"id":2,"content":"一號內容2"},{"id":3,"content":"一號內容3"}]},{"name":"這是二號清單","listID":2,"listData":[{"id":1,"content":"二號內容1"},{"id":2,"content":"二號內容2"},{"id":3,"content":"二號內容3"},{"id":4,"content":"二號內容4"},{"id":5,"content":"二號內容5"}]}]

使用網路上的JSON Reader可看到排版後的資料內容:

這是一個兩層Array的架構,可以有數份清單,每份清單內有數個被編號的內容。

接著當要在程式內把這字串寫出來時,需要變換符號,主要是『"』這符號必須要變更,變更方式等在網路上都找得到,這裡就不贅述。
[{\"name\":\"這是一號清單\", \"listID\":1, \"listData\":[{\"id\":1, \"content\":\"一號內容1\"},{\"id\":2,\"content\":\"一號內容2\"},{\"id\":3,\"content\":\"一號內容3\"}]},{\"name\":\"這是二號清單\",\"listID\":2,\"listData\":[{\"id\":1,\"content\":\"二號內容1\"},{\"id\":2,\"content\":\"二號內容2\"},{\"id\":3,\"content\":\"二號內容3\"},{\"id\":4,\"content\":\"二號內容4\"},{\"id\":5,\"content\":\"二號內容5\"}]}]

然後就來正式寫程式吧:

using System.Collections;
using System.Collections.Generic;
using UnityEngine;
using LitJson;

public class DataController : MonoBehaviour
{
    public class DataClass
    {
        public string name;
        public int listID;
        public ListDataClass[] listData;
    }

    public class ListDataClass
    {
        public int id;
        public string content;
    }

    private string jsonContent = "[{\"name\":\"這是一號清單\", \"listID\":1, \"listData\":[{\"id\":1, \"content\":\"一號內容1\"},{\"id\":2,\"content\":\"一號內容2\"},{\"id\":3,\"content\":\"一號內容3\"}]},{\"name\":\"這是二號清單\",\"listID\":2,\"listData\":[{\"id\":1,\"content\":\"二號內容1\"},{\"id\":2,\"content\":\"二號內容2\"},{\"id\":3,\"content\":\"二號內容3\"},{\"id\":4,\"content\":\"二號內容4\"},{\"id\":5,\"content\":\"二號內容5\"}]}]";
    private JsonData jsonData;
    private List dataClassList = new List();
    private DataClass dataClass = new DataClass();

    void Start()
    {
        jsonData = JsonMapper.ToObject(jsonContent);
        Debug.Log("這是直接版的【Name】:" + jsonData[0]["name"]);
        Debug.Log("這是直接版的【一號清單內的第3項之Content】:" + jsonData[0]["listData"][2]["content"]);
        Debug.Log("------------------------------------------------------------------");

        dataClassList = JsonMapper.ToObject>(jsonContent);

        for (int i = 0; i < dataClassList.Count; i++)
        {
            dataClass = dataClassList[i];

            //Debug.Log("【" + i + "=Name" + "】:" + dataClass.name);
            //Debug.Log("【" + i + "=List ID" + "】:" + dataClass.listID);

            Debug.Log(i);
            Debug.Log("     name:" + dataClass.name);
            Debug.Log("     listID:" + dataClass.listID);
            Debug.Log("     listData");

            for (int j = 0; j < dataClass.listData.Length; j++)
            {
                //Debug.Log("【" + i + "-" + j + "=ID" + "】:" + dataClass.listData[j].id);
                //Debug.Log("【" + i + "-" + j + "=Content" + "】:" + dataClass.listData[j].content);

                Debug.Log("         " + j);
                Debug.Log("             id:" + dataClass.listData[j].id);
                Debug.Log("             content:" + dataClass.listData[j].content);
            }
        }
    }

    void Update()
    {
        if (Input.GetKeyDown(KeyCode.Space))
        {
            dataClassList[0].name = "重新取名字";

            jsonContent = JsonMapper.ToJson(dataClassList);
        }
    }
}

第8行和第15行的兩個Class,是依照JSON的兩層Array架構去宣告的,Class名稱可以任意,但是裡面的變數名稱變數類型一定要完全和JSON的資料一樣。

第28行到第30行是展示用原本的原始方式來取資料。

第33行開始是把JSON字串轉成JSONObject,並套到之前宣告的資料模型內,這樣便可以隨心所欲地提取資料了。

第61行是展示用這種資料模型方式來儲存修改的資料,之後便可依照各自需求把修改後的JSON字串發出去。

程式裡我有弄兩種方式顯示資料,這邊只顯示其中一種,執行程式後在Unity的Console可以看得到:

在使用JSON時最麻煩的是資料被包了又包、包了又包,動輒就好幾層;因此使用這種資料模型的方式時也得去宣告相對應的Class,反而實作只需一行便可取得資料了。

2019年12月2日 星期一

Unity內C#的Event使用方式

C語言有很多實作功能我在過往寫專案時都不會使用到,就像你有一台手機但大部分的附屬功能平常不需要用到一樣,因此自然就沒也特別去注意。但以後也許會有需要用到,還是先研究一下做個記錄比較好。

會用Event的情況通常是我在和其他SDK等做整合時,都已經有那些SDK準備好的Event可直接註冊使用,因此不需要了解那些Event是怎麼生成的;而這邊記錄的是完全無中生有,包含Event的生成、註冊和使用,這樣以後就可以在自己的程式自己來了。

以下是簡單的創造一個Event並來使用:

using System.Collections;
using System.Collections.Generic;
using UnityEngine;
using System;

public class ZZZ : MonoBehaviour
{
    class TypeEventArgs : EventArgs
    {
        public float x = 0;
        public float y = 0;
    }

    private event EventHandler eventHandler;
    private TypeEventArgs tempEventArgs = new TypeEventArgs();

    void Start()
    {
        this.eventHandler += ReceiveData;
    }

    void Update()
    {
        tempEventArgs.x += Time.deltaTime;
        tempEventArgs.y += 2 * Time.deltaTime;

        eventHandler(this, tempEventArgs);
    }

    public void ReceiveData(System.Object sender, EventArgs e)
    {
        Debug.Log(Mathf.FloorToInt((e as TypeEventArgs).x) + " = " + Mathf.FloorToInt((e as TypeEventArgs).y));
    }
}

我做了一個Event,然後觸發此Event的情況是每個Frame時,會顯示一個累加時間和其兩倍的時間值。因此觸發條件便可因應各種需要,例如點擊一個按鈕時、用USB連接的Arduino傳過來資料時、或是有預料之中的錯誤發生時等。就可用Event的形式來加以對應。

2019年9月24日 星期二

Unity內偵測外部資料夾內的檔案變化

有很多案子是需要為使用者留下記錄、和二次使用該記錄等,因此像是當拍下使用者的照片、為使用者製作的卡片、或是為使用者錄製的音檔等,會放置在指定的資料夾內,而其他程式會偵測那些指定資料夾內是否有新檔案出現,有的話便會拿來使用,達成一種更新的狀態。

以前我是會很笨地用List記住資料夾內的檔案,然後每幾秒便用For迴圈去比對檢查,現在有空去研究,便發現了王道方法,輕鬆且簡單。

C#有FileSystemWatcher這個Library,專門用來監視資料夾檔案狀態,因此簡單地設定和啟用,便可為程式去監聽指定的資料夾內檔案狀態。

using System.Collections;
using System.Collections.Generic;
using UnityEngine;
using System.IO;

public class XXX : MonoBehaviour {

    private FileSystemWatcher fileSystemWatcher;

    void Start ()
    {
        DetectFileAction();
    }
 
    void Update ()
    {
  
 }

    public void DetectFileAction()
    {
        fileSystemWatcher = new FileSystemWatcher("S:/Data/", "*.txt");

        fileSystemWatcher.Created += OnChanged;
        fileSystemWatcher.Renamed += OnChanged;
        fileSystemWatcher.Changed += OnChanged;
        fileSystemWatcher.Deleted += OnChanged;
        
        fileSystemWatcher.EnableRaisingEvents = true;
    }
    
    void OnChanged(object source, FileSystemEventArgs e)
    {
        Debug.Log("有檔案被" + e.ChangeType + " = " + e.FullPath);
    }
}

可以看到我偵測四種狀態:創造檔案、重新命名檔案、改變檔案的內容和刪除檔案。

fileSystemWatcher.EnableRaisingEvents是指啟動此程序的意思。

由上而下分別是創造檔案、重新命名檔案、改變檔案的內容和刪除檔案時所出現的相對應訊息,這邊特地列出是為了表明有些時候做某個動作,所得到的回饋會不只一個。

最後有一個很重要的是,如果是較大的檔案,最好不要接收到訊息便立即拿來使用。例如我用Web攝影機錄製了一段使用者的影像,並且將影片儲存到某個資料夾內;雖然其他的程式會立刻接收到Created的訊息,但是檔案實際上可能還沒有創建完成,所以若立即取得並播放的話很可能是白色畫面,因此我都會等一兩秒後再來處理。

2018年5月11日 星期五

Unity內將檔案上傳到FTP

在做專案時有時會需要將檔案上傳到FTP去,像是照片或影片等,所以這邊便記錄一下做法。

我分別遇過需上傳到一般FTP、SFTP和使用主動模式FTP的情況,因此實做過三種方式:FTP的兩種,SFTP和使用主動模式FTP的一種。

這邊只記錄FTP的兩種,第三種有點麻煩,之後有空整理再另外放上來。

使用WebClient的第一種:
using System.Collections;
using System.Collections.Generic;
using System.Net;
using System.Threading;
using UnityEngine;

public class XXX : MonoBehaviour
{
    void Start()
    {
        StartCoroutine(FTPUpload1());
    }
    
    void Update()
    {

    }
    
    IEnumerator FTPUpload1()
    {
        var filename = "D:/XXX.png";
        bool isUploading = false;

        UnityEngine.Debug.Log("開始!!");

        ThreadPool.QueueUserWorkItem((o) =>
        {
            using (WebClient client = new WebClient())
            {
                client.Credentials = new NetworkCredential("kim", "123");
                client.UploadFile("ftp://127.0.0.1/XXX.png", "STOR", filename);
            }
            isUploading = true;
        });

        while (!isUploading)
        {
            UnityEngine.Debug.Log("上傳中!!");
            yield return new WaitForSeconds(0.1f);
        }

        UnityEngine.Debug.Log("結束!!");
    }
}

使用ftpWebRequest的第二種:
using System.Collections;
using System.Collections.Generic;
using System.IO;
using System.Net;
using System.Threading;
using UnityEngine;

public class XXX : MonoBehaviour
{
    void Start()
    {
        StartCoroutine(FTPUpload2());
    }
    
    void Update()
    {

    }
    
    IEnumerator FTPUpload2()
    {
        var filename = "D:/XXX.png";
        bool isUploading = false;

        UnityEngine.Debug.Log("開始!!");

        ThreadPool.QueueUserWorkItem((o) =>
        {
            FtpWebRequest ftpWebRequest = (FtpWebRequest)WebRequest.Create("ftp://127.0.0.1/XXX.png");

            ftpWebRequest.Method = WebRequestMethods.Ftp.UploadFile;
            ftpWebRequest.Credentials = new NetworkCredential("kim", "123");
            ftpWebRequest.UsePassive = true;
            ftpWebRequest.UseBinary = true;
            ftpWebRequest.KeepAlive = true;

            StreamReader sourceStream = new StreamReader(filename);
            byte[] fileBytes = File.ReadAllBytes(filename);
            sourceStream.Close();
            ftpWebRequest.ContentLength = fileBytes.Length;

            Stream requestStream = ftpWebRequest.GetRequestStream();
            requestStream.Write(fileBytes, 0, fileBytes.Length);
            requestStream.Close();

            FtpWebResponse ftpWebResponse = (FtpWebResponse)ftpWebRequest.GetResponse();
            ftpWebResponse.Close();

            isUploading = true;
        });

        while (!isUploading)
        {
            UnityEngine.Debug.Log("上傳中!!");
            yield return new WaitForSeconds(0.1f);
        }

        UnityEngine.Debug.Log("結束!!");
    }
}

2018年2月22日 星期四

Unity內使用Tab切換輸入框的方式

話說我之前有個案子要求可以使用Tab來切換到其他輸入框,如果是Windows程式或是網頁,根本不用為此花功夫;但是Unity就沒這種天經地義的功能了,只好來動手寫一個試看看。

先確立觀念是當按下Tab時,便讓Unity去Focus到某一個介面上,如果先前已點在某一個介面上,便要像是順理成章般地到下一個介面去。

因此做了個簡單的介面:

然後在程式一開始時便Focus在帳號輸入框上,接著按Tab便可在兩個輸入框內不斷切換:
using System.Collections;
using System.Collections.Generic;
using UnityEngine;
using UnityEngine.EventSystems;

public class XXX : MonoBehaviour {

    private GameObject account;
    private GameObject password;

    void Start ()
    {
        account = GameObject.Find("Account");
        password = GameObject.Find("Password");

        EventSystem.current.SetSelectedGameObject(account);
    }

    void Update ()
    {
        if (Input.GetKeyDown(KeyCode.Tab))
        {
            if (EventSystem.current.currentSelectedGameObject == account)
            {
                EventSystem.current.SetSelectedGameObject(password);
            }
            else if (EventSystem.current.currentSelectedGameObject == password)
            {
                EventSystem.current.SetSelectedGameObject(account);
            }
        }
    }
}


所以其實很單純,使用兩個API來取得當前Focus的GUI、和設定想Focus的GUI就好了。

EventSystem.current.currentSelectedGameObject可取得當前Focus的GUI。
EventSystem.current.SetSelectedGameObject()可設定想Focus的GUI。

用這方式可以再配合一個List來做出在複雜輸入介面上輕鬆切換的效果,我想可能有更好的觀念和寫法吧,但我自己是喜歡這個很直觀又方便修改的架構。

2017年11月10日 星期五

Unity內使用UDP方式來進行連線和傳送資料

網路連線、TCP和UDP那些大道理就不講了,不懂的人建議在看這篇前先去觀看一下相關的定義。

這邊簡單來講,有兩個程式分別在兩台電腦上,希望可以透過網路來互相傳遞資料,因此其中之一的作法便是透過UDP方式來進行傳送資料。

可以分開寫成兩個程式,也可以全部都寫在同一個程式內,然後自己再另外寫可選擇當Server或Client的程式。我是常常寫在一個程式內,然後再外加可選擇的方式來定義Server和Client。

所以以下單純來看Script,有Server和Client的Script。

先來看當Client的Script:
using System.Collections;
using System.Collections.Generic;
using UnityEngine;
using System.Net;
using System.Net.Sockets;

public class ClientController : MonoBehaviour {

    private IPEndPoint ipEndPoint;
    private UdpClient udpClient;
    private byte[] sendByte;

    void Start ()
    {
        ipEndPoint = new IPEndPoint(IPAddress.Parse("127.0.0.1"), 5555);
        udpClient = new UdpClient();
        SendUDPData("這是要傳送的資料");
    }

    void Update ()
    {

    }

    void SendUDPData(string tempData)
    {
        sendByte = System.Text.Encoding.UTF8.GetBytes(tempData);
        udpClient.Send(sendByte, sendByte.Length, ipEndPoint);
    }
}
這邊範例的IPAddress是使用Local端,當然也可以使用網際網路的網址。
仔細看程式碼的話,便會知道Client單方面的向Server發送了資料。

再來看當Server的Script:
using System.Collections;
using System.Collections.Generic;
using UnityEngine;
using System.Net;
using System.Net.Sockets;
using System.Threading;

public class ServerController : MonoBehaviour {

    private IPEndPoint ipEndPoint;
    private UdpClient udpClient;
    private Thread receiveThread;
    private byte[] receiveByte;
    private string receiveData = "";

    void Start ()
    {
        ipEndPoint = new IPEndPoint(IPAddress.Any, 5555);
        udpClient = new UdpClient(ipEndPoint.Port);

        receiveThread = new Thread(ReceiveData);
        receiveThread.IsBackground = true;
        receiveThread.Start();
    }

    void Update ()
    {

    }

    void ReceiveData()
    {
        while (true)
        {
            receiveByte = udpClient.Receive(ref ipEndPoint);
            receiveData = System.Text.Encoding.UTF8.GetString(receiveByte);

            Debug.Log("接收到:" + receiveData);
        }
    }

    private void OnDisable()
    {
        udpClient.Close();
        receiveThread.Join();
        receiveThread.Abort();
    }

    private void OnApplicationQuit()
    {
        receiveThread.Abort();
    }
}
可以看到Server的接收是寫在Thread裡面,如果不另外開執行緒來進行資料的監聽接收,那程式會卡死在那不會動,這點很重要。

關閉程式時,一定要徹底關閉這個Thread;不然即使程式關閉了,這個Thread還會依然持續執行,相關資訊可自行上網查詢。

這裡寫的是Client發送資料給Server的單方向範例,當然也可以Server發送資料給Client,寫法完全一樣。

因為我想要最直接呈現UDP的寫法,所以相關安全措施大都沒有加入,像Try catch等這些安全機制其實是應該要加入的。

2017年10月31日 星期二

Unity內用Pointer方式來偵測非互動型的UGUI

在UGUI內像是Button或Slidert等這種可以讓使用者操控的介面,都會有Interactable這個設定,同時也可以使用下列的程式碼偵測到點擊:

if (Input.GetMouseButtonDown(0))
{
    if (EventSystem.current.currentSelectedGameObject != null)
    {
        Debug.Log(EventSystem.current.currentSelectedGameObject);
    }
}
但是像Image或Rawimage等這種非互動類型的介面,無法用上述的方式偵測到,但偏偏有需要的話該怎麼辦?

首先想到的是從Raycast Target這個設定著手,但意外地我無法使用2DRaycast等方式去偵測(應該是要可以才對,是我人品太糟?):

然後發現了Pointer和其相關方式,因此使用了一下,效果就和Button的OnClick一樣:


使用EventTrigger有很多種觸發方式,相當好用:

最後,如果即時創造UGUI,並且需要即時賦予點擊時回傳的參數時,上面那些事先設定的方式就沒法用了,因此查詢一下各種作法後,發現下面這種方式比較適合我。

首先在即時創造的UGUI上,有沒有EventTrigger這個Comoponent都可以,有的話也不要事先添加任何UnityEvent:

然後撰寫下面程式,並將Script附加在該UGUI物件下:
using System.Collections;
using System.Collections.Generic;
using UnityEngine;

public class ImageController : MonoBehaviour, IPointerDownHandler, IPointerUpHandler {

    void Start ()
    {

    }

    void Update ()
    {

    }

    public void OnPointerDown(PointerEventData eventData)
    {
        Debug.Log("Point down = " + this.name);
    }

    public void OnPointerUp(PointerEventData eventData)
    {
        Debug.Log("Point up = " + this.name);
    }
}
這樣就等於當點擊這個UGUI時,程式會回傳該UGUI的名稱,或是其他想回傳的相對應資料了。

Unity內增加UGUI的Button Event方式

一般要來用UGUI的Button,只要事先在Editor內設定好就可以了,例如像這樣:

那為什麼要特別講這個?因為當在做Runtime產生的清單GUI之類時,就需要將Runtime產生的Button即時賦予特定的參數,好讓OnClick的UnityEvent可以在點擊時傳回這個特定的參數。

本來有想嘗試使用預設定義的UnityEvent,例如像是GameObject.name這種看起來可以在點擊時,便自動傳回該UGUI名稱的方式:

但是查詢網路過後,發現使用方式對我來講有些複雜,所以就想說看能不能直接更改已創造的UnityEvent所指定回傳的參數;結果反而發現直接在Button上增加一個全新的UnityEvent還比較快和方便,這樣就可以在創造即時UGUI時,依照需求來即時賦予相對應的UnityEvent了。

首先即時創造出來的Button部分,並不需要事先在OnClick處設定UnityEvent,因為是要靠程式碼來即時創造並附加上去:

然後假設我即時創造了一個GameObject名為"Action"的Button,並且我需要在點擊這個Button時,讓程式回傳給我這個Button名稱:
using System.Collections;
using System.Collections.Generic;
using UnityEngine;
using UnityEngine.UI;

public class ButtonController : MonoBehaviour {

    Button ActionButton;

    void Start ()
    {
        ActionButton = GameObject.Find("Action").GetComponent<Button>();
        ActionButton.onClick.AddListener(delegate { GetButton(GameObject.Find("Action").name); });
    }

    void Update ()
    {

    }

    public void GetButton(string tempData)
    {
        Debug.Log(tempData);
    }
}
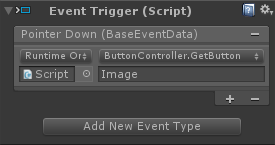
這樣就等於是在Inspector處設定了這個UnityEvent:

可以隨著即時創造的UGUI來進行即時賦予參數了,程式碼也簡單方便。

2017年9月6日 星期三

FFmpeg的使用方式

我想大家應該都知道了,但這邊還是簡單敘述一下FFmpeg:

"這是Open Source的好東西。"
"用來處理視訊、音訊和其他相關的部分。"
"有自己一套的Command line法則,內容博大精深。"

最後加上我自己的心得:"因為很複雜,所以我不是很懂,只摸索過一些基本和專案開發上所需要使用的部分。"

因為之前搜索過相關資訊,發現絕大部分都是直接就講Command line的功用,非常少講FFmpeg從一開始的使用方式;因此像我這麼新手的人,就得要記錄一下從頭到尾的使用方式了。

========================================================================
★取得FFmpeg

首先,上網查一下FFmpeg,就可以找到官網並進入:
這裡官方有註明一句話:"Converting Video and audio has never been so easy.",應該是因為很多人用時總是無法隨心所欲地匯出自己想要的東西,所以才特地標註的吧。

這邊需要注意,要下載的不是標示最大的那個*.tar.bz2檔案,而是Get the packages的Windos平台封包檔才對:

確認你要選擇的版本,這邊預設會是Static的穩定版,然後就可以下載了:

下載完後解壓縮,就可以在bin的資料夾內看到三個應用程式檔,這就是我們所需要的FFmpeg執行檔:

========================================================================
使用FFmpeg

我們可以在任何地方使用FFmpeg的功能,只要把剛剛上面所述的三個檔案和要處理的資源放在同一個資料夾內就好了;Unity的話,如果是Project就將檔案放置在Project的根目錄下,如果是Standalone就將檔案放在和EXE檔同層的地方:
                              

然後創造一個bat批次檔,最簡單的創造方式是可以先創造一個txt檔,檔名可以隨便取,然後把副檔名更改為bat;接著可以用任何文字編輯器來開啟這個bat檔案,在裡面輸入FFmpeg的Cpmmand line後,儲存該bat檔並且執行,就可以得到結果了。

舉例,我想要把mov格式的影片檔,轉檔為mp4格式的檔案;因此我創造了一個名為VideoFormat.bat的檔案,然後在裡面輸入如下的Command line:

然後儲存好內容,關閉文字編輯器,像執行一般exe檔一樣對這個VideoFormat.bat快速滑鼠點擊兩下,就會執行程式並得到轉檔完成的影片檔了:
我將Source.mov轉檔為Result.mp4了,大功告成。

========================================================================
FFmpeg的一些實作功能

這邊講一下,我不會去一個個解釋Command line內的各參數意義和設定方式,也不會在此寫出Unity如何呼叫FFmpeg並使用的方式,原因如下:

1.在網路上已有不少詳盡的FFmpeg教學了,像我這種新手不需要在此搞混大家,有心想學的
   可去找FFmpeg的教學,我也是這樣摸索起來的。
2.Unity呼叫FFmpeg並使用的方式也可在網路上搜尋得到,故不在此記載。
3.FFmpeg最麻煩、且為唯一麻煩的便是Command line的組成方式,一個目的可以有好幾種
   不同的組成方式和參數下法,所以這邊記錄的不會是唯一作法。

那麽下面分享一些我在做專案時實做過的功能,有些是別人告知的,有些是自己參考網路資訊後摸出來的;如果有問題的話請不要問我,因為我應該大多回答不出來吧,所以可依此去網路搜尋相關資訊:

--------------------------------------------------------------------------------------------------------------------------
ffmpeg -i source.avi -c:v libx264 -loglevel 16 -preset slow -c:a aac -b:a copy -crf 15 -vf "scale = 1920:1080" -y -pix_fmt yuv420p result.mp4
pause

將source影片檔轉換格式,匯出result影片檔;檔名、格式和解析度當然可以任意更換。
--------------------------------------------------------------------------------------------------------------------------
ffmpeg -i source.mp4 -loglevel 16 -y -c:v libx264 -preset fast -crf 15 -pix_fmt yuv420p -vf "scale=1280:-1" result.mp4
pause

將source影片檔縮小解析度,匯出result影片檔。
--------------------------------------------------------------------------------------------------------------------------
ffmpeg -f concat -i List.txt -loglevel 16 -y -c copy result.mp4
pause

將記載在List.txt內的影片依順序結合,也可將單一影片重複數次加以結合匯出result影片檔。
List.txt是自創的,檔名可以隨便取,需要幾支影片就輸入幾行,裡面內容如下:

--------------------------------------------------------------------------------------------------------------------------
ffmpeg -r 60 -f image2 -s 640x360 -start_number 001 -i "%%03d.png" -vcodec libx264 -crf 25 -pix_fmt yuv420p -y result.mp4
pause

使用一系列的圖片來生成影片檔,連續圖片檔名部分需對應Command line內所寫的檔名,像在這裡的範例內我使用的是單純只有三位數字的檔名:

========================================================================
FFmpeg使用時的錯誤

使用FFmpeg時很容易發生錯誤,但通常不是FFmpeg本身的錯,而是使用者不了解他所寫的Command line組成有誤、參數設定不正確、或是使用的資源檔不符合規則等;這也是為何FFmpeg會讓人覺得複雜難學的原因,也就是為何官方在主頁會寫那句話的理由。

這邊舉例一下使用時發生的錯誤情況,例如我想要把一系列的圖片轉成影片檔,因此我寫了這個Command line:
ffmpeg -r 60 -f image2 -s 330x125 -start_number 001 -i "GUI%%02d.png" -vcodec libx264 -crf 25 -pix_fmt yuv420p -y result.mp4
pause

接著執行後便發生了這樣的錯誤:

可以看到因為我的圖片本身解析度是330 x 125,所以我在Command line內便設定了同樣的解析度,但是FFmpeg卻沒辦法打包轉成影片檔,因為它須要解析度可被2整除的圖片才行。因此我把所有圖片重新調整了解析度,並且依此重新設定Command line內的解析度:
ffmpeg -r 60 -f image2 -s 330x126 -start_number 001 -i "GUI%%02d.png" -vcodec libx264 -crf 25 -pix_fmt yuv420p -y result.mp4
pause

便順利得到了想要的結果,連續圖片結合成一支影片了:

用這個例子再舉出一個情況,假如我寫這樣的Command line:
ffmpeg -r 60 -f image2 -s 330x126 -start_number 001 -i "GUI%02d.png" -vcodec libx264 -crf 25 -pix_fmt yuv420p -y result.mp4
pause

接著出現這樣的錯誤結果:

可以看得出來FFmpeg依照設定的路徑無法找到相對應的連續圖片,檢查了一下Command line發現原本的路徑"GUI%02d.png"應該寫成"GUI%%02d.png",也就是兩個百分比;因此更改過後再執行,便能正常得到結果了。

使用FFmpeg時,除錯是很重要的能力,不能單是會寫Command line而已,有時候錯誤並非在Command line的組成上。

========================================================================

以上便是我對FFmpeg的一些分享,我以前並不知道FFmpeg這個東西,是換新工作後才接觸到的。使用FFmpeg可以依照需求來調整影片,對製作專案很有幫助,果然工程師就是應該多接觸各方面資訊並提升自己啊。

2017年5月15日 星期一

Unity內用C#來進行複製檔案的方式,直接File copy或Stream

當要預先在外部放置資源,等程式執行後才載入時,會視需要檢測資源檔案是否存在、移動、複製和刪除等,這邊便來記錄一下操控外部檔案進行複製的方式。

自己會做的有兩種,很簡單直接的File.Copy、和有點麻煩的FileStream方式。

首先來看File.Copy的方式,一行就輕鬆愉快地搞定;可是如果檔案很大時,那整個程式就會卡在那邊,畫面看起來就會像當機狀態,所以只適用於小型檔案和在本機端時:
using System.Collections;
using System.Collections.Generic;
using System.IO;

public class XXX: MonoBehaviour {

    void Start()
    {
        if(File.Exists("D:/aaa.mp4"))
        {
            File.Copy("D:/aaa.mp4", "D:/bbb.mp4");
        }
    }

    void Update()
    {

    }
}
然後是FileStream的方式,雖然撰寫比較麻煩,但由於是另外執行,所以不會影響到程式裡其他部分的執行,是比較好的圓融方式,而實際上的複製速度會比File.Copy慢,適用於大型檔案和非本機端時:
using System.Collections;
using System.Collections.Generic;
using System.IO;

public class XXX: MonoBehaviour {

    void Start()
    {
        if(File.Exists("D:/aaa.mp4"))
        {
            StartCoroutine(DownloadMovie());
        }
    }

    void Update()
    {

    }

    IEnumerator DownloadMovie()
    {
        FileStream fromFileStream = null;
        FileStream toFileStream = null;
        byte[] buffer = new byte[32768];
        int read;

        fromFileStream = new FileStream("D:/aaa.mp4", FileMode.Open);
        toFileStream = new FileStream("D:/bbb.mp4", FileMode.Create);

        while ((read = fromFileStream.Read(buffer, 0, buffer.Length)) > 0)
        {
            toFileStream.Write(buffer, 0, read);
              
            yield return new WaitForSeconds(0.01f);
        }

        fromFileStream.Close();
        toFileStream.Close();
    }
}
其他還有很多方式,這裡只是笨笨的我所摸過後會用的兩種。

Unity內用C#尋找比對在Dictionary內Structure的屬性資料

Dictionary可以塞各種不同格式的資料,我比較常用的是放Structure,這樣可以把一個個體的各種屬性資料都放在一塊;但當要條件式比對或尋找裡面的某一個屬性資料時,就有點麻煩,因此在這裡做一個記錄。
using System.Collections;
using System.Collections.Generic;
using UnityEngine;
using System.Linq;

public class XXX : MonoBehaviour {

    public struct playerDataStruct
    {
        public string nickName;
        public int age;
        public int score;
    }

    private Dictionary&lt;string, playerDataStruct&gt; playerDataDictionary = new Dictionary&lt;string, playerDataStruct&gt;();
    private playerDataStruct tempPlayerDataStruct = new playerDataStruct();

    void Start ()
    {
        tempPlayerDataStruct.nickName = "Warrior";
        tempPlayerDataStruct.age = 18;
        tempPlayerDataStruct.score = 1000;

        playerDataDictionary.Add("John", tempPlayerDataStruct);

        tempPlayerDataStruct.nickName = "Fighter";
        tempPlayerDataStruct.age = 20;
        tempPlayerDataStruct.score = 2000;

        playerDataDictionary.Add("Peter", tempPlayerDataStruct);

        //----------------------------------------------------------------------------------------------------------------

        if (playerDataDictionary.Values.Any(x => x.age >= 20) == true)
        {
            Debug.Log("本遊戲有大於20歲以上的玩家。");
        }

        Debug.Log("本遊戲內小於20歲的玩家第一人為:" + playerDataDictionary.Where(x => x.Value.age < 20).Select(x => x.Key).FirstOrDefault());
    }

    void Update ()
    {

    }
}
一般比較常見的情況有:
1.使用Value去逆向尋找Key。
2.判斷此Dictionary內是否包含該Key或是該Value。
3.直接尋找或比對Structure內的某一個屬性。

自己所知的對應方式:

依據條件把找到Key的全都取出
playerDataDictionary.Where(x => x.Value.age < 20).Select(x => x.Key)

取出找到的第一個Key
playerDataDictionary.Where(x => x.Value.age > 20).Select(x => x.Key).FirstOrDefault())
playerDataDictionary.FirstOrDefault(x => x.age >= 20).Key

判斷有無該Key包含在內
playerDataDictionary.ContainsKey("Peter")

判斷有無該Value的屬性包含在內
playerDataDictionary.Values.Any(x => x.age >= 20)

2017年5月9日 星期二

Unity內使用桌面的虛擬鍵盤

虛擬鍵盤一般用在觸控螢幕上,也就是觸控電視和手機平板等,當需要讓使用者輸入的時候就很方便,因此在這記錄一下呼叫虛擬鍵盤的做法,之前在網路上找到並在專案中拿來使用的。

首先是創造一個C#的Script,裡面內容直接如下,可以直接複製貼上:
using System.Collections;
using System.Collections.Generic;
using UnityEngine;
using System;
using System.Diagnostics;
using System.Runtime.InteropServices;

public class VirtualKeyboardController : MonoBehaviour {

    void Start ()
    {

    }

    void Update ()
    {

    }

    public class VirtualKeyboard
    {
        [DllImport("user32")]
        static extern IntPtr FindWindow(String sClassName, String sAppName);

        [DllImport("user32")]
        static extern bool PostMessage(IntPtr hWnd, uint Msg, int wParam, int lParam);

        private static Process _onScreenKeyboardProcess = null;

        //Show the touch keyboard (tabtip.exe).
        public void ShowTouchKeyboard()
        {
            ExternalCall("C:\\Program Files\\Common Files\\Microsoft Shared\\ink\\tabtip.exe", null, false);
            //ExternalCall("TABTIP", null, false);
        }

        //Hide the touch keyboard (tabtip.exe).
        public void HideTouchKeyboard()
        {
            uint WM_SYSCOMMAND = 274;
            int SC_CLOSE = 61536;
            IntPtr ptr = FindWindow("IPTip_Main_Window", null);
            PostMessage(ptr, WM_SYSCOMMAND, SC_CLOSE, 0);
        }

        //Show the on screen keyboard (osk.exe).
        public void ShowOnScreenKeyboard()
        {
            //ExternalCall("C:\\Windows\\system32\\osk.exe", null, false);

            if (_onScreenKeyboardProcess == null || _onScreenKeyboardProcess.HasExited)
                _onScreenKeyboardProcess = ExternalCall("OSK", null, false);
        }

        // Hide the on screen keyboard (osk.exe).
        public void HideOnScreenKeyboard()
        {
            if (_onScreenKeyboardProcess != null && !_onScreenKeyboardProcess.HasExited)
                _onScreenKeyboardProcess.Kill();
        }

        /// <summary>
        /// Set size and location of the OSK.exe keyboard, via registry changes.  Messy, but only known method.
        /// </summary>
        /// <param name='rect'>
        /// Rect.
        /// </param>
        public void RepositionOnScreenKeyboard(Rect rect)
        {
            ExternalCall("REG", @"ADD HKCU\Software\Microsoft\Osk /v WindowLeft /t REG_DWORD /d " + (int)rect.x + " /f", true);
            ExternalCall("REG", @"ADD HKCU\Software\Microsoft\Osk /v WindowTop /t REG_DWORD /d " + (int)rect.y + " /f", true);
            ExternalCall("REG", @"ADD HKCU\Software\Microsoft\Osk /v WindowWidth /t REG_DWORD /d " + (int)rect.width + " /f", true);
            ExternalCall("REG", @"ADD HKCU\Software\Microsoft\Osk /v WindowHeight /t REG_DWORD /d " + (int)rect.height + " /f", true);
        }

        private static Process ExternalCall(string filename, string arguments, bool hideWindow)
        {
            ProcessStartInfo startInfo = new ProcessStartInfo();
            startInfo.FileName = filename;
            startInfo.Arguments = arguments;

            // if just command, we do not want to see the console displayed
            if (hideWindow)
            {
                startInfo.RedirectStandardOutput = true;
                startInfo.RedirectStandardError = true;
                startInfo.UseShellExecute = false;
                startInfo.CreateNoWindow = true;
            }

            Process process = new Process();
            process.StartInfo = startInfo;
            process.Start();

            return process;
        }
    }
}
然後在其他地方來做呼叫或關閉,當然虛擬鍵盤呼叫出來後,也可以直接按鍵盤右上角的X來關閉:
using System.Collections;
using System.Collections.Generic;
using UnityEngine;

public class XXX : MonoBehaviour {

    void Start ()
    {
        VirtualKeyboardController.VirtualKeyboard keyboard = new VirtualKeyboardController.VirtualKeyboard();

        keyboard.ShowOnScreenKeyboard();

        keyboard.HideOnScreenKeyboard();
    }

    void Update ()
    {

    }
}
這樣就可以呼叫和關閉螢幕虛擬鍵盤了,網路上有人說這招在Win 10後就沒辦法叫了,因為Microsoft不再放出虛擬鍵盤的控制權,我自己在Win 10使用是無礙啦......


2017年4月10日 星期一

Unity內使用C#來Email寄信

現在用程式發Email這種事已基本到是一種必備功能了,但我就是沒有去實做過,所以趁這次工作上有需要用,借助Google大神的力量,自己也成功地在Unity內手動寄出第一封Mail,趕快記錄一下寫法。

我是以自己的Gmail做寄信人,所以SmtpClient的部分是參考用Gmail時的寫法,用其他家的Mail時設定都會不一樣的樣子。
using System.Collections;
using System.Collections.Generic;
using UnityEngine;
using System.Net;
using System.Net.Mail;

public class EmailController : MonoBehaviour {

    void Start ()
    {
    }

    void Update ()
    {
    }

    void EmailAction()
    {
        MailMessage mailMessage = new MailMessage ();
        SmtpClient smtpClient = new SmtpClient ("smtp.gmail.com");
        Attachment attachment = new Attachment (@"Assets/A.png");    //指定要夾帶的物件路徑

        mailMessage.From = new MailAddress ("寄信人信箱", "寄信人名字", System.Text.Encoding.UTF8);
        mailMessage.To.Add ("收信人信箱1");
        mailMessage.To.Add ("收信人信箱2");
        mailMessage.CC.Add ("收信人信箱3");
        mailMessage.Bcc.Add ("收信人信箱4");

        mailMessage.Subject = "送給你一張好圖片";
        mailMessage.Body = "這是我精挑細選、要送給你的一張好圖片。";
        mailMessage.SubjectEncoding = System.Text.Encoding.UTF8;
        mailMessage.BodyEncoding = System.Text.Encoding.UTF8;
        mailMessage.Attachments.Add (attachment);
        mailMessage.Priority = MailPriority.High;

        smtpClient.Port = 587;
        smtpClient.Credentials = new System.Net.NetworkCredential ("寄信人信箱", "寄信人信箱密碼") as ICredentialsByHost;
        smtpClient.EnableSsl = true;

        ServicePointManager.ServerCertificateValidationCallback = delegate(object sender,                   
                                        System.Security.Cryptography.X509Certificates.X509Certificate certificate,
                                        System.Security.Cryptography.X509Certificates.X509Chain chain,
                                        System.Net.Security.SslPolicyErrors sslPolicyErrors)
                                        {
                                             return true;
                                        };

        smtpClient.Send (mailMessage);

        Debug.Log ("寄信完成!!");
    }
}
在使用此方式時,作為SMTP的信箱帳戶必須要將安全防護性降低,才能順利寄出信件。

2017年4月5日 星期三

Unity內使用C#清除暫存記憶體的方式

最近在做專案時,忘記了加入釋放記憶體的機制,導致程式開了幾個小時就會當掉,故在此為粗心的自己記錄所知的釋放方式;這些方式有的是正規、有的是經驗、有的還是自己亂七八糟的觀念,所以不敢說絕對正確,主要是當需要釋放記憶體時,可用這些資訊作為起頭,直接使用或是以此去尋找更完整的資訊。

--------------------------------------------------------------------------------------------------------

首先是一般使用的情況:
GameObject x = GameObject.Find( "cube" );
x = null;
藉由設為null而釋放掉x。

--------------------------------------------------------------------------------------------------------

使用Unity內的WWW方式下載物件時:
WWW wwwObject;

wwwObject.Dispose();
wwwObject = null;
--------------------------------------------------------------------------------------------------------

使用Resources載入物件時:
Resources.UnloadUnusedAssets ();
--------------------------------------------------------------------------------------------------------

使用GC機制時,單純的方式:
GC.Collect();
依照現有的所有層代來逐一釋放:
for( int k = 0; k <= GC.MaxGeneration; k++ )
{
    GC.Collect (k);
    GC.WaitForPendingFinalizers ();
}
關於GC.Collect的說明:
https://msdn.microsoft.com/zh-tw/library/y46kxc5e(v=vs.85).aspx

關於GC.WaitForPendingFinalizers的說明:
https://msdn.microsoft.com/zh-tw/library/system.gc.waitforpendingfinalizers(v=vs.110).aspx

有一點在意的地方是,網路上有人說若是GC.Collect()使用頻繁過多,會造成效能過度消耗和程式變得奇怪運作。

--------------------------------------------------------------------------------------------------------

GC機制還有一種使用方式:
public void Dispose()
{
    Dispose(true);
    GC.SuppressFinalize(this);
}
關於GC.SuppressFinalize的說明:
https://msdn.microsoft.com/zh-tw/library/ms182269.aspx

當在看說明時,會發現此方式會有正確和不正確的情況,但是看Mircosoft官方的範例會注意到差別只有在不正確為GC.SuppressFinalize(true);,而正確為GC.SuppressFinalize(this);這兩個地方。

--------------------------------------------------------------------------------------------------------

最後是Mircosoft官方對於自動記憶體管理的說明,簡單來講是設定變數為null和使用GC.Collect():
https://msdn.microsoft.com/zh-tw/library/aa691138(v=vs.71).aspx

2016年9月10日 星期六

Unity內使用WebClient和Stream方式來下載遠端檔案

一般Unity下載遠端檔案,大家都是用WWW的方式來做;但是WWW的結果是將下載的檔案直接匯入到Unity內,沒有辦法放在外面,要放在外面還得自己事後存出去,像是文檔或圖片等,那如果下載的是AssetBundle怎麼辦?光想就覺得很麻煩......

當然Unity有WWW.LoadFromCacheOrDownload這樣的方式,但我想要的是更直接地把下載檔案放在外部,之後自己比對是否需要再次下載覆蓋或可直接本地端匯入,因此就來尋找了一般的下載方式。

找到的有WebClient和Stream兩種方式。WebClient很簡單,可說是一口氣就能搞定的輕鬆方式,但是如果是在Unity內用的話,當下載檔案的量大時,程式就會卡在那沒法做其它事了,所以我個人會比較傾向使用Stream的方式,只是程式碼就沒那麼簡便了。

--------------------------------------------------------------------------------------------------------

WebClient:
using UnityEngine;
using System.Collections;
using System.Net;

public class WebClientController : MonoBehaviour {

    void Start ()
    {
        WebClient webClient = new WebClient();

        try
        {
            webClient.DownloadFile( "http://localhost:8080/xxx.assetbundle", "D:/xxx.assetbundle" );
        }
        catch( Exception ex )
        {
            Debug.Log( ex );
        }
    }
}
雖然我想一併使用下載過程的檢視,但是這部分的效果就是出不來,只好先記錄程式碼,日後有空再來試。
webClient.DownloadProgressChanged += new DownloadProgressChangedEventHandler( WebClient_DownloadProgressChanged );
webClient.DownloadDataCompleted += new DownloadDataCompletedEventHandler( WebClient_DownloadDataCompleted );

void WebClient_DownloadProgressChanged( object sender, DownloadProgressChangedEventArgs e )
{
    Debug.Log( "下載" + e.ProgressPercentage + "%" );
}

void WebClient_DownloadDataCompleted (object sender, DownloadDataCompletedEventArgs e)
{
    Debug.Log( "下載完成" );
}
--------------------------------------------------------------------------------------------------------

Stream:
using UnityEngine;
using System.Collections;
using System.Net;

public class WebClientController : MonoBehaviour {

    HttpWebRequest httpWebRequest;
    HttpWebResponse httpResponse;
    System.IO.Stream dataStream;
    byte[] buffer = new byte[8192];
    int size = 0;
    float downloadMemory = 0;
    bool completeCheck = false;

    void Start ()
    {
        try
        {
            httpWebRequest = (HttpWebRequest)WebRequest.Create( "http://localhost:8080/xxx.assetbundle" );
            httpResponse = (HttpWebResponse)httpWebRequest.GetResponse();
            dataStream = httpResponse.GetResponseStream();
            fileStream = new FileStream( "D:/xxx.assetbundle", FileMode.Create, FileAccess.Write );

            downloadMemory = 0;
        }
        catch( Exception e )
        {
            Debug.Log( e );
        }
    }

    void Update ()
    {
        if( completeCheck == false )
        {
            try
            {
                size = dataStream.Read( buffer, 0, buffer.Length );

                if( size > 0 )
                {
                    fileStream.Write( buffer, 0, size );
                    downloadMemory += size;
                    Debug.Log( "正下載 " + ( downloadMemory / 1048576 ).ToString( "f1" ) + "MB / " +
                                ((float)httpResponse.ContentLength / 1048576 ).ToString( "f1" ) + "MB == " +
                                (( downloadMemory / (float)httpResponse.ContentLength ) * 100 ).ToString( "f1" ) + "%" );
                }
                else
                {
                    fileStream.Close();
                    httpResponse.Close();
                    buffer = new byte[8192];

                    Debug.Log( "下載完成!" );

                    completeCheck = true;
                }
            }
            catch( Exception ex )
            {
                Debug.Log( ex );
            }
        }
    }
}
--------------------------------------------------------------------------------------------------------

Unity內用WWW載入AssetBundle

大家都知道,AssetBundle是Unity用來打包資源的方式。
大家也知道,AssetBundle對於Script的不方便,一定要在Project內事先放入相同的Script,才能讓AssetBundle上的Script相對應到。

但這都不是重點,本篇的重點是將AssetBundle匯入到Unity程式內使用。
using UnityEngine;
using System.Collections;

public class AssetBundleLoadController : MonoBehaviour {

    void Start ()
    {
        StartCoroutine( LoadAssetBundle() );
    }

    private IEnumerator LocalLoad()
    {
        WWW fileBundle = new WWW( "file://D:/xxx.assetbundle" );
        yield return fileBundle;

        GameObject tempObject = null;
        yield return tempObject = Instantiate( fileBundle.assetBundle.mainAsset ) as GameObject;
        tempObject.name = tempObject.name.Replace( "(Clone)", string.Empty );

        fileBundle.assetBundle.Unload( false );
        Resources.UnloadUnusedAssets();
    }
}
這樣就能使用AssetBundle的內容物了。

2016年6月13日 星期一

Unity內轉換Direction和EulerAngles為Quaternion

一般在3D間內有三種可表現方向的方式:
Direction:向量方式,例如( 1, 0, 0 )表示面向正左方。
EulerAngles:尤拉角(由拉角、歐拉角)方式,例如( 0, 180, 0 )表示面向正後方。
Qaternion:四元數。

Direction和EulerAngles都很好理解,而Qaternion即使我能理解它的原理,但還是不擅使用。
偏偏有不少關於方向的使用都得是Qaternion型式,所以轉換就很重要。

Direction轉換成Qaternion,可以使用Qaternion.LookRotation:
Qaternion LookRotation( Vector3 forward, Vector3 upwards = Vector3.up );
例如Qaternion rotation = Qaternion.LookRotation( new Vector3( 1, 0, 0 ), Vector3.up );

EulerAngles轉換成Qaternion,可以使用Qaternion.Euler:
Quaternion Euler( float x, float y, float z );
例如Quaternion rotation = Quaternion.Euler( 0, 30, 0 );

這樣當需要使用Quaternion時,我就可以用這些方式去轉換了。

2016年6月8日 星期三

Unity內偵測有否點擊到UGUI作出來的介面

Unity現在可使用方便的UGUI功能作介面,而當要操控2D介面或是作3D物件控制時,都是使用滑鼠左鍵;所以一般邏輯為當滑鼠初次點擊在2D介面上時,就不會啟動3D物件控制功能,因此需要偵測滑鼠是否點擊在任何UGUI作出來的2D介面上。

UGUI在創建時,會自動在【Hierarchy】下產生Canvas』和EventSystem』兩個物件,EventSystem』便是用來處理點擊等事件的存在,所以會使用它來得知是否有滑鼠點擊任何UGUI物件,並可取得所點擊的介面物件。


using UnityEngine;
using System.Collections;
using UnityEngine.EventSystems;

public class MainProcess : MonoBehaviour {

    void Update ()
    {
        if( Input.GetMouseButtonDown( 0 ) )
        {
            if( EventSystem.current.IsPointerOverGameObject() )
            {
                Debug.Log( "有介面被點擊到!" );
                Debug.Log( EventSystem.current.currentSelectedGameObject );
            }
        }
    }
}